这是来自 Google 官方的 Material Design 培训教程的翻译,受个人水平所限,难免有翻译不对的地方,欢迎交流指正。
Material design 中的动画能够让应用程序给予用户对于动作的反馈,提供用户交互的视觉持续性。 Material 主题为按钮和活动转场效果提供默认的动画, Android 5.0 (API 21) 以上版本可以定制这些动画,并创建新的:
- 触摸反馈
- 圆形波纹
- 活动转场效果
- 曲线移动
- 视图状态改变
自定义触摸反馈
Material design 中的触摸反馈可以为用户与 UI 元素的交互提供持续的视觉确认。按钮上的默认的触摸反馈动画使用新的 RippleDrawable 类,该类在不同的状态切换中使用波纹效果。
大部分情况下,你需要在视图的 XML 中指定视图背景来应用这个功能:
?android:attr/selectableItemBackground: 实现有边界的波纹。?android:attr/selectableItemBackgroundBorderless: 在视图之上的波纹。它将被绘制在最近的背景不为空的父视图内。
注意:
selectableItemBackgroundBorderless是在 API 21 中引入的新属性。
你也可以使用 ripple 元素在 XML 资源中定义 RippleDrawable 。
可以为 RippleDrawable 对象设置颜色。要改变默认的触摸反馈的颜色,使用主题中的 android:colorControlHighlight 属性。
更多信息,可以查看类 RippleDrawable 的 API 参考。
使用显示效果
当显示或者隐藏一组 UI 元素时,显示动画能提供用户视觉连续性。 ViewAnimationUtils.createCircularReveal() 方法来使用裁剪为圆形动画来显示或隐藏视图。
要实现一个之前不可见的视图使用这种效果:
1 | // 之前不可见的视图 |
要隐藏之前可见的视图使用这种效果:
1 | // 之前可见的视图 |
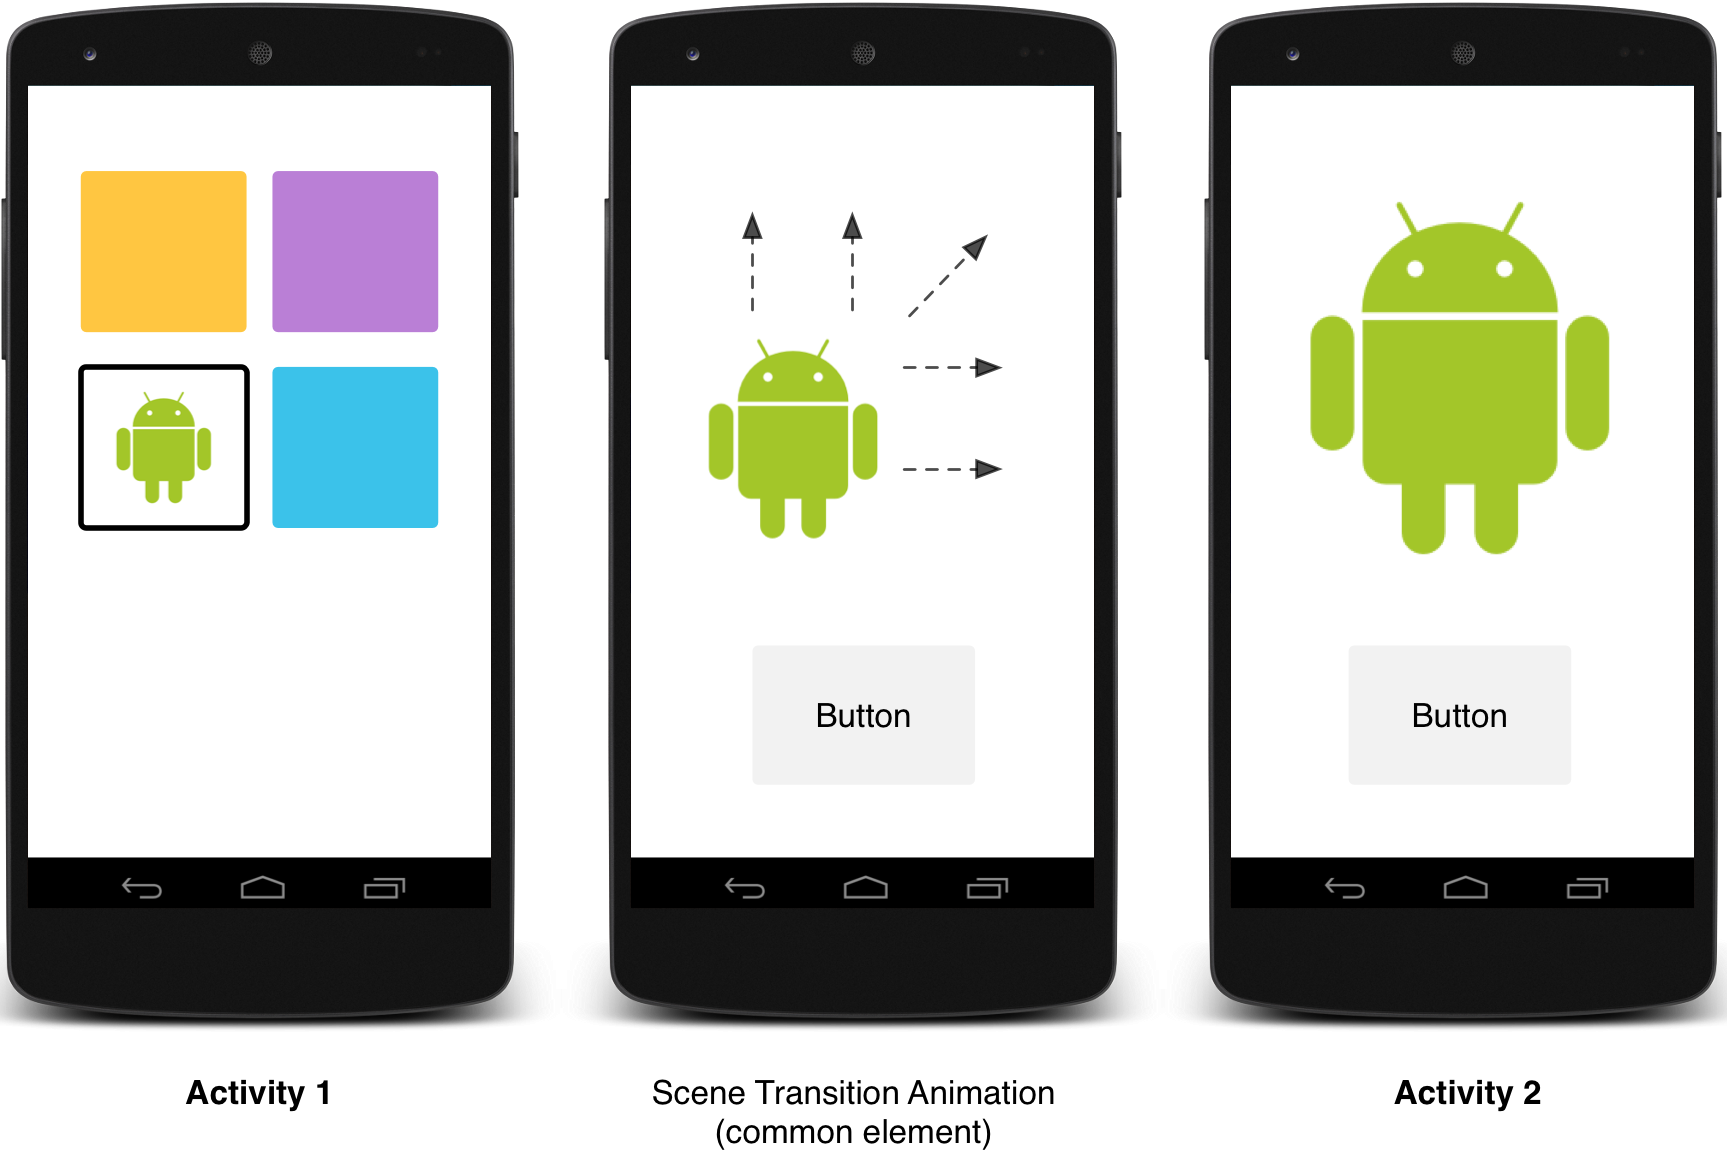
自定义活动转场效果
在 Material design 特性的应用程序中,活动转场效果提供公共元素在移动和转换上不同状态下的视觉连接。你可以指定自定义的进场/退场效果及活动间的共享元素转场。
- 进场效果决定活动中的视图如何进入场景。例如,在 explode 进场效果中,视图从外部飞入到屏幕的中心。
- 退场效果决定活动中的驶入如何退出场景。例如,在 explode 退场效果中,视图从中心退出场景。
- 共享元素转场效果决定活动之间共享视图在两个活动间的转场。例如,在两个活动中同一个图片在不同的位置且尺寸不同, changeImageTransform 共享元素转场在活动之间平滑的平移和缩放这些图片。
Android 5.0 (API 21) 支持下面这些进场和退场效果:
- explode - 从场景中间移入或移出视图。
- slide - 从场景的一边移入或移出视图。
- fade - 通过修改透明度在场景中添加或者移除视图。
所有继承自 Visibility 类的转场支持进场/退场效果。更多信息,查看 API 参考的 Transition 类。
Android 5.0 (API 21) 同时支持共享元素的转场效果:
- changeBounds - 动画改变目标视图的布局边界。
- changeClipBounds - 动画改变目标视图的裁剪边界。
- changeTransform - 动画改变目标视图的缩放和旋转。
- changeImageTransform - 动画改变图片的尺寸和缩放。
如果应用程序中开启了活动转场效果,进入或退出活动时默认的 cross-fading 转场效果将被激活。
指定自定义转场效果
首先,定义一个风格继承自 material 主题,并设置 android:windowContentTransitions 属性来开启窗口内容转场。你也可以在风格定义中指定进场,退场和共享元素转场效果。
1 | <style name="BaseAppTheme" parent="android:Theme.Material"> |
这个例子中 change_image_transform 转场效果定义如下:
1 | <!-- res/transition/change_image_transform.xml --> |
change_image_transform 元素与 ChangeImageTransform 类相对应。更多信息,可以查看 API 参考 Transition。
在代码中,可以通过调用 Window.requestFeature() 方法来开启窗口内容转场。
1 | // inside your activity (if you did not enable transitions in your theme) |
在代码中,可以通过调用下面的方法,并传递 Transtion 对象来确定转场效果:
- Window.setEnterTransition()
- Window.setExitTransition()
- Window.setSharedElementEnterTransition()
- Window.setSharedElementExitTransition()
setExitTransition() 和 setSharedElementExitTransition() 定义了调用该方法的活动的退场效果。setEnterTransition() 和 setSharedElementEnterTransition() 则定义调用该方法的活动的进场效果。
要获取转场的完整效果,你取药开启调用与被调用活动的窗口内容转场功能。否则,调用活动可以开始退场效果,但是你最后只能看到一个窗口转场(缩放或者淡入)。
在被调用的活动中使用 Window.setAllowEnterTransitionOverlap() 方法来尽快启动一个进场效果,这能让你拥有很炫酷的进场效果。
使用转场效果启动活动
如果你开启转场效果并为活动设置了退场效果,当你启动另一个活动时,转场效果将被激活,如下所示:
1 | startActivity(intent, |
如果你为第二个活动设置了进场效果,当活动开始时转场效果将被激活。要在启动另一个活动时禁用转场效果,提供一个为 null 的可选 bundle。
启动带有共享元素的活动
创建带有共享元素的两个活动的屏幕转场需要:
- 在主题中开启窗口内容转场。
- 在风格中指定共享元素转场。
- 将转场效果定义为 XML 资源。
- 在布局中的共享元素通过
android:transitionName属性来分配一样的名字。 - 使用 ActivityOptions.makeSceneTransitionAnimation() 方法。
1 | // 获取接收点击事件的元素 |
在代码中,可以通过在两个活动中使用 View.setTransitionName() 方法来指定公共元素名称来共享动态视图。
当你结束第二个活动,想要反转转场动画时,调用 Activity.finishAfterTransition() 代替 Activity.finish() 。
启动带多个共享元素的活动
创建带有多个共享元素的活动转场,在布局中使用 android:transitionName 属性来定义共享元素,或者在活动代码中用 View.setTransitionName() 方法。然后创建 ActivityOptions 对象:
1 | ActivityOptions options = ActivityOptions.makeSceneTransitionAnimation(this, |
使用曲线移动
Material design 中的动画依赖于时间插值曲线并运动收空间所限。
Animations in material design rely on curves for time interpolation and spatial movement patterns. With Android 5.0 (API level 21) and above, you can define custom timing curves and curved motion patterns for animations.
PathInterpolator 类是基于贝塞尔曲线和一个 Path 对象的新的插值器。这个插值器指定在 1x1 方形上的运动曲线,拥有 (0,0) 和 (1,1) 两个锚点,并且使用构造器参数为指定的控制点。也可以在 XML 资源中定义路径插值器:
1 | <pathInterpolator xmlns:android="http://schemas.android.com/apk/res/android" |
在 material design 规范中系统为 3 种基本曲线提供了 XML 资源。
@interpolator/fast_out_linear_in.xml@interpolator/fast_out_slow_in.xml@interpolator/linear_out_slow_in.xml
可以传递一个 PathInterpolator 对象到 Animator.setInterpolator() 方法。
ObjectAnimator 类有新的构造器来支持一次性使用2个或多个属性,与路径一起来推动坐标。例如,下面的动画会之气使用一个 Path 对象来推动视图的 X 和 Y 属性:
1 | ObjectAnimator mAnimator; |
动画视图状态改变
StateListAnimator 类定义视图状态改变时运行的动画。下面的实例展示如何在 XML 资源中定义一个 StateListAnimator 。
1 | <!-- animate the translationZ property of a view when pressed --> |
要为视图关联自定义视图状态动画,需要在 XML 资源文件中使用 selector 元素来定义动画绘制器,并将它分配到视图的 android:stateListAnimator 属性。通过代码来分配一个状态列表动画绘制器到视图,则使用 AnimationInflater.loadStateListAnimator() 方法,分配动画绘制器到视图使用 View.setStateListAnimator() 方法。
当你的主题继承自 material 主题,按钮默认由 Z 动画。要禁用按钮的行为,需要设置 android:stateListAnimatro 属性为 @null。
AnimatedStateListDrawable 类可以创建图片用来显示关联视图的状态变化的动画。某些 Android 5.0 上的系统组件默认使用这些动画。下面的实例展示如何使用 XML 资源定义一个 AnimatedStateListDrawable 。
1 | <!-- res/drawable/myanimstatedrawable.xml --> |
动画矢量图片
矢量图片在缩放过程中不会丢失清晰度。 AnimatedVectorDrawable 类定义了矢量图片的属性。
通常可以在三个 XML 文件中定义动画矢量图片:
- 在
res/drawable/中的使用<vector>元素定义矢量图片。 - 在
res/drawable/中使用<animated-vector>元素来定义动画矢量图片。 - 在
res/anim/中使用<objectAnimator>元素定义一个或多个对象的动画绘制器。
动画矢量图片可以推动 <group> 和 <path> 元素的属性。 <group> 元素定义路径或者子组的集合, <path> 元素定义需要绘制的路径。
当你定义一个你需要动画的矢量图片时,使用 android:name 属性来为组和路径分配唯一的名称,这样就可以从动画器的定义中应用他们。例如:
1 | <!-- res/drawable/vectordrawable.xml --> |
在矢量图片中,动画矢量图片定义通过名称与组和路径相关联:
1 | <!-- res/drawable/animvectordrawable.xml --> |
动画定义为 ObjectAnimator 或者 AnimatorSet 对象。这个实例中的第一个动画绘制器将目标组旋转 360 度:
1 | <!-- res/anim/rotation.xml --> |
这个例子中的第二个动画绘制器改变矢量图片的路径从一种形状到另一种。两条路径需要匹配改变:他们需要相同数量的命名,并且每个命令要有相同数量的参数。
1 | <!-- res/anim/path_morph.xml --> |
更多信息,可以查看 AnimatedVectorDrawable 的 API 参考文档。